Mastering Eye Direction in Photoshop: A Step-by-Step Guide
In the vibrant, ever-evolving world of digital photography and image editing, the ability to subtly alter the direction of a subject’s gaze can transform an ordinary photo into a compelling piece of art. Whether it’s a candid group shot where someone isn’t looking at the camera or a portrait where the gaze needs adjustment, Photoshop offers a plethora of tools to make this possible. Today, we delve into the art of changing eye direction seamlessly using Photoshop, ensuring your subjects always look right where you want them to.
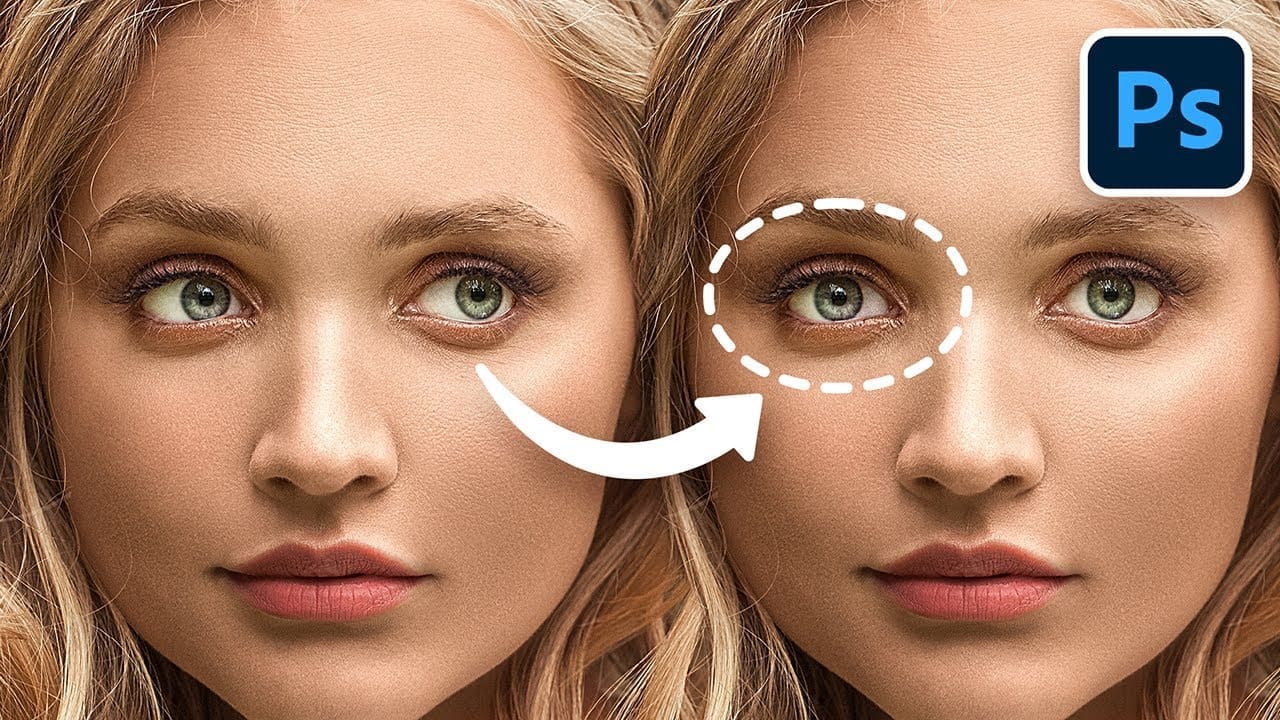
Understanding the Basics: The Group Photo Fix
Imagine you’ve captured a group photo, but unfortunately, not everyone is looking at the camera. No worries! Photoshop comes to the rescue. The initial step involves using the Lasso Tool to make a selection around the eyes that need repositioning. Remember, it’s crucial to leave a bit of space around the selection for an easy fix.
Once selected, duplicate the eyes onto a new layer (using Ctrl or Command + J). This duplication allows you to move the eyes independently of the original image. If the positioning looks off, a simple adjustment with the Move Tool (V) and a bit of retouching with the Brush Tool can make a world of difference. Selecting the right color with the Eyedropper Tool (set to Point Sample) and painting over any mismatched areas ensures a seamless blend.
Advanced Techniques: Detailed Portrait Adjustment
When working with a close-up portrait, precision becomes key. After duplicating the selected eyes onto a new layer, you might need to adjust their orientation slightly. This is where transformative tools and fine masking come into play. A soft, round brush to mask off the edges of the new eye placement helps integrate the gaze adjustment naturally into the image.
However, the challenge doesn’t end here. Fixing problematic areas around the newly positioned eyes might require more advanced Photoshop tools. Utilizing features like the Clone Stamp Tool or the innovative Generative Fill option can address these issues, especially in the latest Photoshop versions. Generative Fill, in particular, offers a quick fix for small discrepancies that arise from repositioning the eyes, blending them seamlessly into the original image.
Final Touches for Perfection
After adjusting the eyes and addressing any immediate issues with tools like Generative Fill, it’s time for the final corrections. Creating a new layer for these adjustments allows for non-destructive edits. The Remove Tool, with ‘Sample All Layers’ checked, becomes invaluable here, enabling you to clean up any remaining discrepancies or gaps around the eyes. This meticulous attention to detail ensures a natural and coherent look across the entire image.
For those seeking to perfect their skills further, platforms like Envato Elements and GraphicRiver offer resources and tutorials to explore more advanced techniques and creative possibilities.
Expanding Your Creative Toolbox
While Photoshop remains a powerhouse for image editing, exploring additional tools can elevate your creative workflow. Luminar Neo introduces AI-driven enhancements, making complex edits simpler and more intuitive. For graphic designers and digital artists, incorporating assets from Dealjumbo and Placeit can add that extra flair to your projects, whether through unique fonts, templates, or mockups.
Conclusion
Changing the direction of a subject’s eyes in Photoshop is not just about the technical steps involved. It’s about bringing a vision to life, ensuring your subjects convey the intended emotion or focus. By mastering these techniques, you unlock a new realm of creative possibilities, enhancing the narrative and impact of your photographs. Whether it’s through subtle adjustments in a group photo or more detailed work in a portrait, the key lies in practice, patience, and a keen eye for detail.
Downloads
Timestamps
00:00 What NOT to Do
00:42 Technique 1 – For Less-Detailed Photos
03:02 Technique 2 – For High-Detailed Photos
07:18 Cleanup and Finishing Touches
09:06 Quick Recap
09:34 Major Announcement


@artmaltman
What was wrong w the neural filter version? I am looking in iPhone so maybe my screen was not big enough to see. Thank you.
@SonySteals
This is some creepy sht 😂😂
@Gihozopatrick-cu5ly
I'm glad to see u again 😭
@radoo86
very nice, and usefull
@riddhimandas7058
Dude have find way accidentally for him and now it's tutorial 😂 it can also save your future gf from looking up on other girls 😃
Great video as always ❤
@xNULNULx
Since Vtubers are trending these days and in high demand, it would be awesome if you had a full tutorial on how to properly cut and organize character parts in Photoshop before uploading them to Live2D.
@HistoryXt
bro fixing stuff i don't even see
@sanb3586
The first time he is using actual quality photos people are actually editing in photoShop 😂😅
@Atechet
CAPTAIN JACK SPARROW VERSION, best line in the episode
@AjaySharma-po2yy
❤❤ Sir please…..
Share name of screen recorder you are using…..
@eldimo
Thank you very much!
@jorgefiocchi
You are a Genius!!! 👏👏👏
@GFXgrow
This is your golden words
. . . " keep creating ". . .
@cinemaousally7878
Sir i am beginner in ps and i am facing issue of drang and drop can u fix it or give any suggestion
@user-im8jq8xe9g
thanks random photoshop expert guy
@TwoDudeGamesChnnel
Great video! But I want to add something you didn't mentioned… Eyes iris physically stick out a bit, that causes skin to stretch in the direction person is looking in. So ideally you also need to use liquify to correct the shape of eyeholes.
@DaleSteadman
Welcome to Colorado, you should check out Garden of the Gods while you are there.
@greenday1guitarfreak
Bro you are a lifesaver
@LyndaFishyMom
Great tutorial as always. I do not often do portraits but I tried this out on one I found where the subject was looking directly into the camera Using your technique to move her eyes to one side provided a natural look while the neural filter made her look really weird.
@amarartstudio5341
Thank you
@LeCype
Thank you! That was very useful for me. Your videos really help me improve my skills